Easy Cardboard Tube Flying Bee Origami Craft
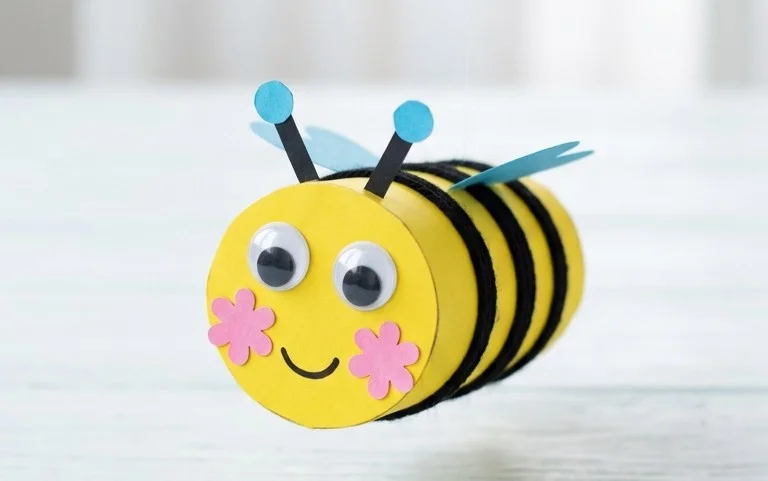
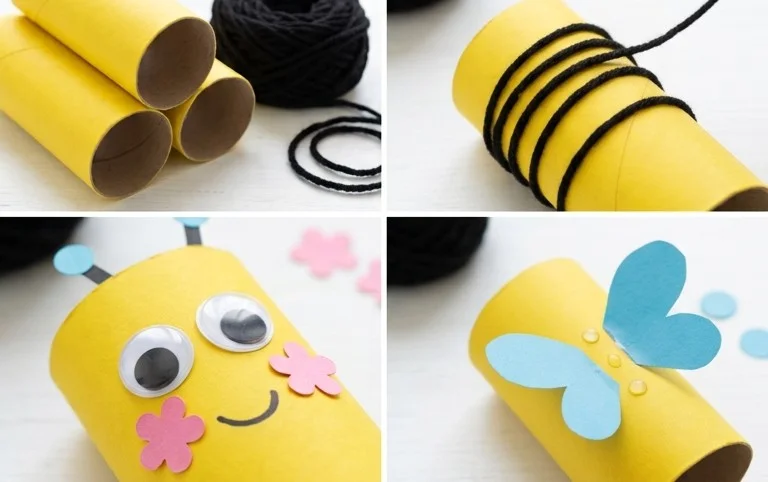
Cardboard tube flying bee craft – get ready to make a buzzy friend! This fun project transforms a simple cardboard tube into an adorable bee that looks like it’s ready to take flight. Imagine a chubby, yellow-and-black striped body with delicate paper wings, two little antennae peeking out, and a friendly little face. It’s the perfect craft for complete beginners and fantastic for kids to get creative with. You can have your very own flying bee ready in about 30 minutes, making it a quick and satisfying activity! In this tutorial, I’ll guide you step-by-step through simple folding, cutting, and decorating techniques to bring your bee to life. Let’s get started and create something wonderful together!
Crafting a Cardboard Tube Flying Bee: A Whimsical Origami Adventure
Hello there, budding origami enthusiasts! Today, we’re embarking on a delightful journey to create a charming flying bee using a humble cardboard tube as its body. This project is a wonderful way to combine crafting with a touch of origami magic, and it’s surprisingly easy to achieve a fantastic result, even for absolute beginners. We’ll be focusing on simple folds and clever techniques to bring our buzzy friend to life.
Choosing Your Paper: The Wings of Our Bee
The paper you choose for your bee’s wings is crucial to its overall appeal. For this project, I highly recommend using standard origami paper.
* **Type:** Origami paper, also known as kami, is ideal. It’s specifically designed for folding, holding creases beautifully and being thin enough to allow for multiple layers without becoming too bulky. Other thin, crisp papers like printer paper (though it’s a bit stiffer and might require more force for sharp creases) or even wrapping paper (if it’s not too thick) can work in a pinch.
* **Weight:** Standard origami paper is usually around 70-90 gsm (grams per square meter). This weight provides a good balance between sturdiness and foldability. Avoid cardstock or very thick paper, as it will be difficult to fold precisely and can damage your cardboard tube.
* **Size:** For this project, we’ll be using a square piece of paper. A 6-inch (15 cm) square is a fantastic starting point for beginners. It’s a manageable size, allowing for clear folds and easy handling. If you want a larger bee, you can scale up with a 7.5-inch (19 cm) or even a 9-inch (23 cm) square.
* **Single or Double-Sided:** You can use either single or double-sided paper. If you use single-sided paper, the inside of the wings will be white. If you use double-sided paper, the wings will have color on both sides. For a classic bee look, yellow or patterned paper for the top side and black or a darker color for the underside can create a lovely contrast. However, for simplicity, a single-sided yellow or orange paper works wonderfully.
Mastering the Base Folds: Building Blocks of Our Bee
Before we dive into the bee’s specific sequence, let’s get comfortable with a couple of fundamental origami folds. Practicing these will ensure your bee turns out neat and tidy.
The **valley fold** is the most common fold. Imagine folding a piece of paper in half so the crease forms a ‘V’ shape, like a valley. To make a clean valley fold, align the edges or corners precisely, then run your fingernail or a bone folder firmly along the crease.
The **mountain fold** is the opposite of a valley fold. When you unfold the paper, the crease forms an inverted ‘V’, like the peak of a mountain. We’ll use mountain folds to give our bee’s wings dimension.
Your Step-by-Step Bee Folding Adventure
Let’s begin! We’ll start by preparing the wings.
1. **Prepare Your Paper:** Take your square piece of origami paper. If it’s double-sided, place it colored side down on a flat surface. This means the side you want to be on the inside of the folds will be facing up.
2. **First Diagonal Valley Fold:** Bring the bottom-left corner of the square up to meet the top-right corner. Align these corners as perfectly as you can. Once aligned, press down firmly along the diagonal crease that forms from the bottom-right to the top-left edge. Unfold the paper completely. You should now have a diagonal crease running across your square.
3. **Second Diagonal Valley Fold:** Now, bring the bottom-right corner of the square up to meet the top-left corner. Again, align the corners precisely. Press down firmly along the crease. Unfold the paper completely. You now have two diagonal creases forming an ‘X’ across your square.
4. **Horizontal Valley Fold:** Flip your paper over so the colored side is facing up. Bring the bottom edge of the square up to meet the top edge. Align these edges perfectly. Press down firmly along the horizontal crease. Unfold the paper.
5. **Vertical Valley Fold:** Keep the paper colored side up. Bring the left edge of the square over to meet the right edge. Align these edges perfectly. Press down firmly along the vertical crease. Unfold the paper. You should now have an ‘X’ of diagonal creases and a ‘+’ of horizontal and vertical creases, all visible on the colored side.
6. **Forming the Waterbomb Base:** This is where it gets a little magical! With the colored side still facing up, gently push the left and right sides of the paper inwards. The horizontal crease should start to fold inwards, and the vertical crease should help guide this. As you push the sides in, the top point will naturally want to come down. Bring the top point down to meet the bottom point, collapsing the paper along the existing creases. You should end up with a smaller square. This is called the waterbomb base. Ensure all the raw edges are neatly tucked together at the bottom point.
7. **Opening the Flaps:** Take the top layer of the right flap of your waterbomb base and fold its bottom edge up to meet the center vertical crease. Crease firmly. Repeat this with the top layer of the left flap, folding its bottom edge up to meet the center vertical crease. Crease firmly.
8. **Folding the Top Triangles:** You’ll notice two triangular flaps pointing upwards at the top. Take the top point of the right flap you just folded and fold it downwards. The tip of this triangle should reach the bottom point of the flap. Crease firmly. Repeat this with the top point of the left flap.
9. **Unfolding and Creating Petal Folds:** Now, unfold the last three folds you made: the two side flap folds and the two top triangle folds. You should see the creases you just made. This is to pre-crease for the next step. With the colored side facing up, gently open up the top layer of the right flap. Using the creases you just made as guides, lift the bottom point upwards and flatten the sides inwards. This is called a petal fold. The sides will fold inwards along the diagonal creases you made earlier, and the bottom point will come up to form a new point. Crease firmly. Repeat this petal fold on the left side. You should now have a kite-like shape on top of a square.
10. **Flipping and Repeating:** Flip your entire model over. You should see the other side of the waterbomb base. Repeat steps 7 through 9 on this side:
* Fold the bottom edge of the right flap up to meet the center vertical crease.
* Fold the bottom edge of the left flap up to meet the center vertical crease.
* Fold the top point of the right flap down to the bottom point.
* Fold the top point of the left flap down to the bottom point.
* Unfold these last four folds.
* Perform the petal fold on the right side, lifting the bottom point and flattening the sides inwards using the creases.
* Perform the petal fold on the left side.
11. **Narrowing the Wings:** You now have a shape with two “legs” pointing downwards. Take the right leg and fold its outer edge inwards to meet the center vertical line. Crease firmly. Repeat this with the left leg, folding its outer edge inwards to meet the center vertical line. Crease firmly.
12. **Flipping and Repeating:** Flip your model over. Repeat step 11 on this side, folding the outer edge of each leg inwards to meet the center vertical line.
13. **Forming the Wings:** You should now have a long, narrow diamond shape with two flaps at the top. Take the top right flap and fold it downwards and outwards at an angle. This will form one of the bee’s wings. The angle determines how spread out the wings are. Crease firmly. Repeat this with the top left flap, folding it downwards and outwards at a similar angle to create the other wing.
14. **Creating the Bee’s Body:** Take the point at the bottom of your folded shape (where the two legs met) and fold it upwards. The amount you fold up will determine the length of your bee’s body. I usually fold it up about halfway or two-thirds of the way. Crease firmly.
15. **Attaching to the Tube:** Now for the fun part! Take your cardboard tube. Gently spread the two wings of your origami bee apart. Slide the folded-up point (the bee’s body) into the cardboard tube. You might need to gently encourage it to go in. Aim to have about half an inch to an inch of the folded point sticking out of the tube.
16. **Securing the Wings:** To make your bee truly “fly,” we need to secure the wings. Apply a small dab of glue or a strip of double-sided tape to the inside of the cardboard tube, where the origami paper body is inserted. Press the origami paper body against the glue or tape to secure it firmly in place. You can also add a tiny bit of glue at the base of the wings where they meet the tube to keep them from drooping.
Common Pitfalls and How to Avoid Them
Even with clear instructions, we all stumble sometimes! Here are a couple of places beginners often go wrong with this model, and how to keep them from happening:
* **Uneven Folds:** The most common issue is not aligning corners and edges perfectly. This leads to a lopsided bee. To avoid this, take your time with each fold. Really focus on making those edges meet precisely before you crease. Don’t rush the alignment. If a fold isn’t quite right, gently unfold and try again. A sharp crease is important, but perfect alignment is even more so for a balanced look.
* **Forcing the Waterbomb Base:** The waterbomb base (step 6) can be a bit tricky. If you’re struggling to get it to collapse, gently press the sides inwards while guiding the top point down. Don’t force it with too much pressure, as this can rip the paper. Instead, visualize how the creases are meant to work together to bring the paper into the smaller square shape. Gentle, guided pressure is key.
Let Your Creativity Take Flight: Variations
Once you’ve mastered the basic bee, why not have some fun with variations?
* **Size:** As mentioned, using larger or smaller squares of origami paper will naturally result in bigger or smaller bees. Experiment with different sizes and see how they look!
* **Paper Pattern:** Gone are the days of plain yellow bees! Use patterned origami paper with floral designs, stripes, or even a subtle metallic sheen. You could even use recycled paper with interesting textures or prints.
* **Color:** Think beyond yellow and black! Make blue bees, pink bees, or even rainbow bees. The possibilities are endless. For a more realistic look, you could use patterned paper for the wings with black and yellow stripes.
* **Eyes and Antennae:** For an extra touch of personality, you can draw small black dots for eyes on the cardboard tube body, or even attach tiny pipe cleaner antennae.
Displaying and Gifting Your Buzzed-About Creation
Your finished flying bee is more than just a craft; it’s a miniature work of art!
* **Mobile Magic:** String several bees together at different lengths to create a beautiful, whimsical mobile that can hang in a nursery, playroom, or even a sunroom.
* **Garden Guardians:** Attach them to small stakes and place them in potted plants for a cheerful, unexpected burst of color.
* **Party Favors:** These little bees make fantastic party favors for birthdays or themed events. Package them in small cellophane bags with a ribbon.
* **Gifts with a Personal Touch:** Present your origami bees as a unique gift to friends and family. They’re a thoughtful way to say “buzzing with love!” You can even attach them to gift cards or tie them onto presents.
Creating your cardboard tube flying bee is a rewarding experience that combines paper folding with simple assembly. Enjoy the process, embrace any little imperfections as part of its charm, and have fun bringing these little buzzing friends to life!
Conclusion
Congratulations on completing your Cardboard Tube Flying Bee craft! We hope you had a buzzing good time creating this adorable little pollinator. Don’t worry if your first bee isn’t perfect; think of it as practice! Every artist starts somewhere, and the joy is in the making. Feel free to share your finished flying bee with friends and family – they’ll surely be delighted!
Looking for more fun? Try making a whole swarm by varying the stripes with different colored paper or adding some sparkly glitter for extra magic.
We hope this project has sparked your creativity. Explore more of our paper projects for even more crafting adventures!