Easy Triskele Paper Globes: 3D Origami Ornaments
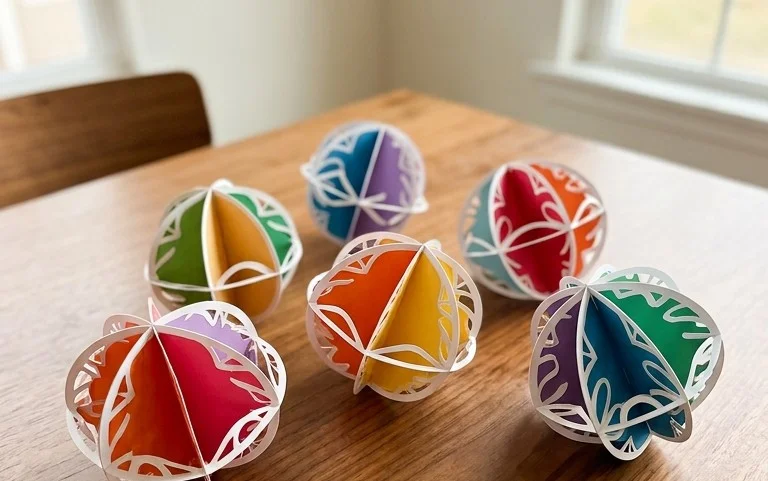
Triskele Paper Globes are truly stunning handmade 3D ornaments that bring a touch of magic to any space! Imagine delicate, interconnected paper shapes that create a beautiful, spherical form, casting intriguing shadows and looking absolutely captivating as they hang. Whether you’re a complete beginner to origami, looking for a fun craft project with kids, or need a unique, handmade gift that will impress, these globes are perfect. They’re also a fantastic addition to your holiday decorations or as a year-round unique embellishment. This project typically takes about 30-60 minutes to complete, depending on your pace. In this tutorial, I’ll guide you step-by-step through folding each individual component and then show you how to assemble them into these breathtaking 3D paper wonders. Let’s get crafting!
Creating Your Own Triskele Paper Globes: A Journey into 3D Origami Art
Hello there! I’m so excited to guide you through the creation of these beautiful Triskele Paper Globes, a wonderful 3D origami ornament that brings a touch of magic to any space. These are truly stunning and surprisingly achievable, even if you’re new to paper folding. We’ll go through everything step-by-step, so don’t worry if you haven’t folded much before. The joy is in the process, and the result is incredibly rewarding!
Choosing the Right Paper: The Foundation of Your Globe
The paper you choose is paramount to the success and beauty of your Triskele Paper Globe. For these globes, a medium-weight paper is ideal. Think of paper that’s a step up from standard printer paper but not as thick as cardstock.
Type of Paper: I find that origami paper works wonderfully. It’s usually thin, crisp, and holds a crease beautifully. However, good quality scrapbooking paper, or even some coloured copy paper, can also yield lovely results. The key is for the paper to be foldable without tearing easily and to be able to hold its shape once creased.
Weight: A good weight to aim for is between 80gsm and 120gsm (grams per square meter). This provides enough structure to hold the globe’s shape without being too bulky to fold precisely.
Size: For your first globe, I recommend starting with a square piece of paper that’s around 6 inches (15 cm) by 6 inches. This size is manageable for learning the folds and for seeing the details clearly. As you become more comfortable, you can experiment with smaller or larger sizes.
Single or Double-Sided: This is where you can really play with creativity!
* **Single-sided paper:** If you use single-sided coloured paper (white on one side, colour on the other), your globe will have a dominant colour on the outside, with the white showing in certain areas where the folds reveal the inner layers. This can create a subtle, elegant look.
* **Double-sided paper:** This is what I often prefer for these globes. When you use paper that has a different colour or pattern on each side, the inside layers of the folds will show through, creating a dynamic and visually interesting effect. Imagine a bright red on the outside and a patterned floral on the inside – the red will dominate, but hints of the floral pattern will peek through as you fold. It adds depth and character.
The Base Folds: Building the Structure
Before we dive into the specific Triskele Globe sequence, let’s practice a couple of fundamental folds that will be used throughout. Making these base folds cleanly will make the rest of the process much smoother.
* **Valley Fold:** This is the most basic fold. Imagine you’re folding a piece of paper in half to make a book. You bring one edge to meet the opposite edge and crease down the middle. The crease will create a “valley” shape when viewed from above.
* **Mountain Fold:** This is the opposite of a valley fold. Imagine you’ve made a valley fold, and now you’re unfolding it. If you then push the crease inwards so that it forms a “mountain” shape pointing upwards, that’s a mountain fold. Often, we pre-crease a valley fold and then reverse it to be a mountain fold later in a sequence.
* **Creasing:** The key to clean folds is a sharp crease. After you bring the edges or corners together, run your fingernail or a bone folder firmly along the folded edge. This makes the crease crisp and helps the paper hold its shape.
Your Triskele Paper Globe: A Step-by-Step Walkthrough
Let’s begin! We’ll be working with a square piece of paper. For clarity, let’s assume we’re using double-sided paper with Colour A on one side and Colour B on the other.
1. Start with your square paper. If you’re using double-sided paper, place it in front of you with Colour A (the colour you want to be the dominant outside colour) facing upwards.
2. Fold the paper in half diagonally. Bring the bottom right corner up to meet the top left corner. Crease firmly. You’ll now have a triangle.
3. Unfold the paper. You should see a diagonal crease.
4. Fold the paper in half diagonally again, but this time in the other direction. Bring the bottom left corner up to meet the top right corner. Crease firmly.
5. Unfold the paper. You should now have two diagonal creases forming an “X” across your square.
6. Now, let’s create some horizontal and vertical creases. Turn the paper over so Colour B is facing upwards.
7. Fold the paper in half horizontally. Bring the bottom edge up to meet the top edge. Crease firmly.
8. Unfold the paper. You should see a horizontal crease.
9. Fold the paper in half vertically. Bring the left edge over to meet the right edge. Crease firmly.
10. Unfold the paper. You should now see a horizontal crease and a vertical crease, forming a “+” in the centre. The diagonal creases from before will still be visible.
11. Now, we’re going to create a preliminary base, sometimes called a waterbomb base, which is a common origami structure. With Colour B still facing upwards, gently push the left and right sides of the paper inwards towards the centre, along the vertical crease. As you do this, the top edge should start to fold downwards. Encourage the paper to collapse along the existing creases. The goal is to flatten the paper into a smaller square, with four triangular flaps. The original top and bottom edges will now meet in the centre. This step can feel a bit counter-intuitive at first, but the creases will guide you. Make sure the point where all four corners meet is perfectly aligned.
12. You should now have a square shape, with Colour B facing upwards. There are two layers of paper on each side. Each side has two triangular flaps.
13. Take the top flap on the right side. Fold its bottom edge upwards so it meets the centre vertical crease. Crease firmly.
14. Repeat step 13 with the top flap on the left side. Fold its bottom edge upwards to meet the centre vertical crease. Crease firmly. You should now have two triangular flaps meeting in the middle, resembling a kite shape on the top layer.
15. Now, look at the very top point of this kite shape. Fold this entire top triangular section downwards, so the point of the triangle touches the bottom edge of the two flaps you just folded up. Crease firmly. This small triangular fold will act as a lock.
16. Now, gently unfold the last three folds you made (steps 13, 14, and 15). You’ll see the crease marks.
17. Now we need to reverse these folds. This is where we create a “petal fold” or “squash fold” effect. Lift the top layer of paper slightly. You’ll see the crease marks from your previous folds. You want to open up the paper along the centre vertical crease you made earlier, and then push the sides inwards. The bottom edge of the top flap will come up, and the sides will fold in along the creases you made. The small triangular flap you folded down in step 15 will now be on the outside, helping to hold everything together. This action forms a diamond shape on the top layer. The goal is to have the original corners of the top flap now pointing upwards and downwards.
18. Turn the entire model over.
19. Repeat steps 13 through 17 on this new side. So, fold the bottom edge of the right flap to the centre crease, then the bottom edge of the left flap to the centre crease. Then, fold the top triangular section down. Finally, unfold these three folds and perform the squash/petal fold to create the diamond shape on this side.
20. You should now have a diamond shape with two points at the top and two points at the bottom. Each side looks like a diamond with a small triangular flap sticking out at the top.
21. Now, we will start forming the three arms of the Triskele. Take one of the side points (let’s say the right point). Fold it upwards and outwards, aligning its bottom edge with the vertical centre crease of the diamond. Crease firmly.
22. Repeat step 21 with the left side point. Fold it upwards and outwards, aligning its bottom edge with the vertical centre crease. Crease firmly.
23. You should now have two points folded upwards, resembling wings. The single triangular flap that was sticking out at the top of each diamond is still there.
24. Now, we’re going to bring the third arm into play. Take the very top point of the diamond (which was originally the bottom point before you did steps 21 and 22). Fold this point downwards, so it tucks *underneath* the two flaps you just folded upwards. You’ll want to fold it down far enough so that it meets the horizontal line where the two upward-pointing flaps begin. Crease firmly. This is the third arm.
25. You should now have a shape that looks like a star or a propeller, with three points extending outwards. If you look at the base, you’ll see where all the layers come together.
26. Now, to inflate your globe. Gently pull apart the three points (arms) of the Triskele. You will see the centre start to open up. Carefully puff air into the opening. As you do this, the paper will naturally expand and form a spherical shape. You might need to gently guide the paper to help it expand evenly. Be patient!
27. Once inflated, the little triangular flaps you created earlier in steps 15 and 17 will help to hold the globe’s shape. You can gently tuck them in if needed to secure the form.
Common Pitfalls and How to Avoid Them
It’s completely normal to encounter a few bumps in the road when learning a new origami fold. Here are two common places beginners often go wrong with this model, and how to overcome them:
1. **The Preliminary Base (Waterbomb Base) Collapse:** Step 11, where the flat square collapses into the smaller square base, can be tricky.
* **Why it goes wrong:** People often try to force the paper into shape or don’t make sharp enough creases in the initial steps. This leads to the paper not collapsing cleanly along the intended lines.
* **How to avoid it:** Go back to step 5 and make sure your diagonal, horizontal, and vertical creases are sharp and accurate. When you get to step 11, with Colour B facing up, gently push the left and right edges inwards *simultaneously*. The top should naturally start to come down. If it’s not collapsing, gently guide it along the creases you’ve already made. Don’t force it. It’s like guiding a flower to bloom.
2. **Achieving a Nice, Spherical Shape:** Inflating the globe in step 26 can sometimes result in a lopsided or flattened shape.
* **Why it goes wrong:** Not puffing enough air, or puffing unevenly. Also, if the previous folds weren’t precise, the paper might not have the structure to expand fully.
* **How to avoid it:** Be patient! Gently blow into the centre opening. As you blow, use your fingers to gently ease the paper outwards. Imagine you are helping a balloon inflate evenly. If one side looks flatter, gently nudge it outwards while continuing to blow. Ensure all your earlier folds were crisp – this gives the paper the “memory” to hold its expanded shape. Don’t be afraid to gently adjust the paper as it inflates.
Varying Your Triskele Paper Globes
The beauty of origami is its endless potential for variation! Here are a few ways you can customize your Triskele Paper Globes:
* **Size:** As I mentioned, start with a 6-inch square. For smaller, delicate ornaments, try 3-inch squares. For larger, statement pieces, you could go up to 10 or 12-inch squares. Just remember that with larger paper, your creases need to be even sharper to maintain the integrity of the folds.
* **Paper Pattern and Colour:** This is where you can really let your imagination run wild!
* **Solid Colours:** Use different shades of the same colour for a sophisticated look, or contrasting colours for a bold statement.
* **Patterned Paper:** Origami paper comes in a vast array of beautiful patterns – florals, geometric designs, metallic sheens, traditional Japanese motifs. Using patterned paper can create incredibly unique globes.
* **Double-Sided Fun:** Experiment with combinations like bright, solid colours on the outside and subtle patterns on the inside, or vice versa. Metallic papers can add a touch of glamour.
* **Hand-Painted or Stamped Paper:** If you’re feeling artistic, try hand-painting or stamping your own patterns onto plain paper before folding.
* **Adding Embellishments:** Once your globe is folded and inflated, you can add a touch of sparkle. A dab of glitter glue along the edges, or a small bead or charm tied to the top can make it even more special.
Ideas for Displaying and Gifting Your Creations
These Triskele Paper Globes are so versatile, and they make truly heartfelt handmade gifts.
* **Holiday Ornaments:** They are perfect for decorating a Christmas tree, a holiday wreath, or a festive garland.
* **Mobiles:** String several together at different lengths to create a beautiful, lightweight mobile that will gently sway.
* **Table Centerpieces:** Cluster a few together in a shallow bowl for an eye-catching and elegant table decoration.
* **Gift Toppers:** Instead of a traditional bow, tie one of these gorgeous globes onto a gift for a unique and memorable touch.
* **Party Decorations:** They can add a whimsical and celebratory feel to birthday parties, baby showers, or weddings.
* **Unique Gifts:** Imagine gifting these to friends, family, or colleagues. They are wonderful for birthdays, thank you gifts, or just because. They are a testament to your time and care. You can present them in a small gift box or tissue paper.
I hope you enjoy the process of creating your own Triskele Paper Globes. They are a testament to the beauty that can be achieved with simple paper and mindful folding. Happy folding!
Conclusion
Congratulations on reaching the end of our Triskele Paper Globes tutorial! We hope you’ve enjoyed bringing these beautiful, handmade 3D ornaments to life. Don’t worry if your first attempt isn’t perfect – remember, it’s all part of the learning process. The joy is in the making, and each Triskele paper globe you create will become even more polished with practice.
Once you’ve finished your stunning creation, we’d love to see it! Share your finished model with friends and family, or tag us online to inspire others.
Ready for More?
For your next adventure, why not try a globe with different colored paper for a vibrant effect, or perhaps experiment with adding glitter or metallic accents?
We encourage you to explore more paper projects and continue to unleash your creativity. Happy folding!