Easy Trigami Dragon Origami: Step-by-Step Paper Craft
Dragon origami, specifically this incredible trigami design by Nguyen Linh Son, is what we’re diving into today! Imagine a majestic dragon, its body a series of sharp, interlocking triangles, its wings outstretched and ready for flight. This project is perfect for anyone, from complete beginners eager to try something new to kids looking for a fun, rewarding challenge. It makes a fantastic decoration for your desk or a unique, handmade gift. You can expect this to take roughly 30-60 minutes, depending on your pace. We’ll learn how to create precise folds, build structural integrity using basic triangle units, and bring this mythical creature to life with just a single sheet of paper. Get ready to fold your way to a fantastic creation!
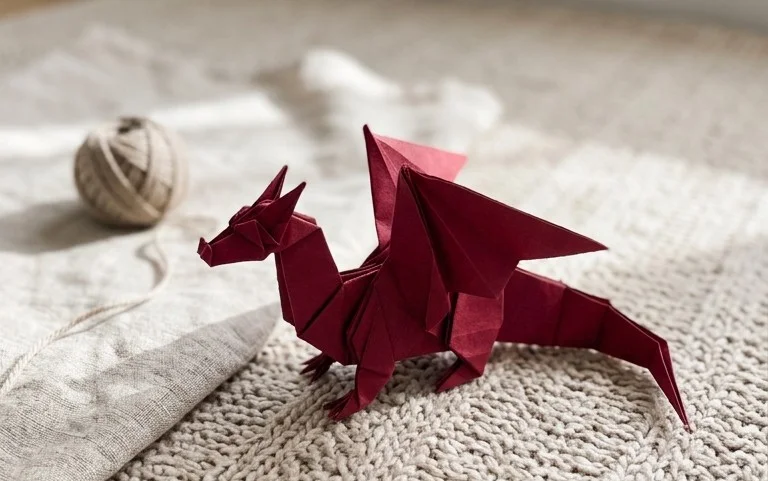
## Crafting Your Own Origami Dragon: A Trigami Masterpiece
Hello, fellow paper enthusiasts! Today, we’re embarking on an exciting journey to fold a magnificent origami dragon, a design by the incredibly talented Nguyen Linh Son, often referred to as a “Trigami” dragon due to its foundation in triangle folds. This dragon is a fantastic project for those who have a little origami experience under their belts, but even if you’re a dedicated beginner, with patience and careful attention, you can absolutely conquer it. We’ll break down every step, address common pitfalls, and explore how to personalize your creation.
### Choosing Your Paper: The Foundation of Flight
The right paper is crucial for any origami model, and for our Trigami dragon, it plays a significant role in both the folding process and the final aesthetic.
* **Type:** For this dragon, I highly recommend using standard origami paper. This paper is thin, strong, and holds creases beautifully. Avoid thicker cardstock or construction paper, as they will be difficult to fold precisely and can obscure the intricate details of the dragon’s form. Traditional washi paper is also a wonderful choice if you have access to it, offering a lovely texture and a more luxurious feel.
* **Weight:** Origami paper typically comes in weights around 70-80 gsm (grams per square meter). This is the sweet spot for this dragon. It’s thin enough for multiple layers and sharp folds, but robust enough to maintain the model’s structure.
* **Size:** For your first attempt, I suggest starting with a square piece of paper that is at least 6 inches (15 cm) per side. This larger size will give you more room to work with and make it easier to see and execute the folds accurately. As you become more confident, you can experiment with smaller sizes, but be warned – the smaller the paper, the more challenging it becomes to achieve precision.
* **Single or Double-Sided:** This is where you can inject some personality!
* **Single-sided paper:** If you use paper that’s colored on one side and white on the other, your dragon will have a beautiful contrast, with hints of white showing through in certain areas, adding depth and visual interest. This is often the most striking option.
* **Double-sided paper:** If you have paper that’s colored on both sides, or paper with a pattern on both sides, your dragon will be uniformly colored or patterned. This can be very effective, especially with patterned papers that evoke scales or ancient textures. The choice is entirely yours!
### The Crucial Base Folds: Building Blocks of Your Dragon
This dragon, as the name “Trigami” suggests, relies heavily on a few fundamental folds that create a series of triangular units. Mastering these will make the rest of the process much smoother.
* **The Preliminary Base (Square Base):** This is a very common starting point in origami.
1. Begin with your square piece of paper, colored side down if using single-sided paper.
2. Fold the paper in half diagonally, bringing one corner to meet the opposite corner. Crease firmly. Unfold.
3. Now fold the paper in half along the other diagonal, bringing the remaining two corners together. Crease firmly. Unfold. You should now have an “X” crease on your paper.
4. Flip the paper over.
5. Fold the paper in half horizontally, bringing the bottom edge to meet the top edge. Crease firmly. Unfold.
6. Fold the paper in half vertically, bringing the left edge to meet the right edge. Crease firmly. Unfold. You should now have a “+” crease on this side.
7. Bring the left and right edges inwards, collapsing the paper along the existing creases. The top and bottom edges will meet. This should naturally form a smaller square with four flaps, one on each side. This is your Preliminary Base.
* **The Bird Base:** This is a vital intermediate base for many complex models, including our dragon.
1. Start with your Preliminary Base, with the open end (where all the flaps meet) facing away from you.
2. Take the right flap and fold its bottom edge inwards to meet the center crease. Crease firmly.
3. Repeat with the left flap, folding its bottom edge inwards to meet the center crease. Crease firmly. You should now have a kite shape on the top layer.
4. Fold the small triangular tip at the top downwards, creasing along the line where the two folded edges meet. Crease firmly.
5. Unfold the last three folds you just made (the two side folds and the top triangle fold).
6. Now, lift the bottom point of the top flap upwards, using the creases you just made to help guide the fold. As you lift, the sides will fold inwards. This is called a “petal fold.” Flatten the whole thing down. You should now have a diamond shape on top.
7. Flip the entire model over.
8. Repeat steps 2-6 on this side. You have now completed the Bird Base. It will look like a diamond with two “legs” at the bottom and two flaps at the top.
### The Fold Sequence: Bringing Your Dragon to Life (Numbered Walkthrough)
Now, let’s get folding! Remember to crease firmly and precisely at each step. We’ll assume you’re starting with the Bird Base, with the two “legs” pointing downwards and the open flaps pointing upwards.
1. **Prepare the Legs:** Take one of the “legs” (which will become the dragon’s neck and tail). Fold its outer edge inwards to meet the center crease. Do this on both sides of this leg, so it becomes a thinner, more defined point. Repeat this exact process on the other “leg.” You’ll now have two narrower points at the bottom.
2. **Form the Neck and Tail:** Take one of these narrow legs and fold it upwards at an angle. This will be the neck of your dragon. Decide on the angle you like – a sharper angle might make for a more dramatic pose. Crease firmly. Now, take the other narrow leg and fold it upwards at a similar angle. This will be the dragon’s tail. Crease firmly.
3. **Shape the Head:** Focus on the leg you designated as the neck. We need to create the head. Take the very tip of this neck and perform an “inside reverse fold.” To do this, open up the fold slightly where you want the head to bend. Push the tip inwards and downwards between the layers, creating a sharp angle for the head. Crease firmly.
4. **Create the Wings:** Look at the two upper flaps of your Bird Base. These will become the wings. Take one of these flaps and fold it downwards, at an angle that looks pleasing to you. This fold will create the main shape of one wing. Crease firmly. Flip the model over and repeat this fold on the other flap, ensuring the wings are as symmetrical as possible.
5. **Refine the Wings (Optional but Recommended):** To give your wings more definition, you can make additional folds. For example, you could fold the edges of each wing inwards to create a more pointed or scalloped edge, depending on your preference. Experiment here!
6. **Add Details to the Neck and Tail:** To make the neck and tail look more dragon-like, you can perform a series of small “pleat folds” or “zigzag folds” along their length. For the neck, you might fold a small section up, then a small section down, then up again, and so on. This creates a segmented look. Repeat this on the tail.
7. **Shape the Feet (Optional):** Depending on how you folded the initial “legs” in step 1, you might have some paper left at the bottom. You can carefully fold these into small points to represent the dragon’s feet if you wish, or simply let them trail.
8. **Final Touches:** Gently bend and shape the wings and neck to give your dragon a dynamic pose. You can also slightly curl the tail.
### Where Beginners Often Stumble (And How to Avoid It)
Don’t worry if your first attempt isn’t perfect; origami is a skill that improves with practice. Here are a few common stumbling blocks and how to sidestep them:
* **Fuzzy or Inaccurate Creases:** This is the number one enemy of precise origami.
* **How to avoid:** Use your fingernail or a bone folder (if you have one) to make every crease sharp and decisive. When unfolding, align the edges and corners perfectly before creasing. Don’t be afraid to unfold and refold if a crease isn’t quite right.
* **Misinterpreting “Inside Reverse Fold”:** The inside reverse fold for the head can be tricky for beginners.
* **How to avoid:** Carefully reread the description and visualize the action. The key is to open the existing fold *just enough* to push the paper *inside* the layers, then flatten it down to create the new angle. It’s like making a valley fold inside the mountain fold. If you’re really struggling, it can be helpful to watch a video of this specific fold being executed.
* **Uneven Wing Folds:** Making the wings symmetrical is key to a balanced-looking dragon.
* **How to avoid:** When folding the wings, try to visually match the angle of the first wing on the second. Make sure the starting points and ending points of your wing folds are in the same relative positions on both sides.
### Making It Your Own: Variations and Personalization
The beauty of origami is its endless potential for variation. Here’s how you can make your Trigami dragon truly unique:
* **Size:** As mentioned, start with larger paper and work your way down. Folding a miniature dragon from 3-inch paper is a delightful challenge once you’ve mastered the larger version.
* **Paper Pattern:** This is where you can really get creative!
* **Scales:** Look for paper with printed scales, or even use paper that has a subtle textured pattern that resembles scales.
* **Metallic:** Metallic origami paper can give your dragon a majestic, almost metallic sheen.
* **Washi with traditional patterns:** Japanese washi paper often features beautiful, intricate patterns that can make your dragon look like it’s adorned with ancient silks.
* **Hand-painted paper:** If you’re feeling artistic, why not paint your own paper before folding?
* **Color:** Don’t be afraid to go beyond traditional green or red. Imagine a blue dragon with white accents, or a fiery orange and yellow dragon. The color choices can evoke different moods and personalities for your dragon.
### Displaying and Gifting Your Creation
Your finished origami dragon is a work of art, deserving of a special place or a thoughtful gift.
* **Display:**
* **Desk Companion:** Place it on your desk as a reminder of your crafting success.
* **Shelf Decor:** Arrange it with other origami models or decorative items on a bookshelf.
* **Mobile:** With a bit of fishing line and a hoop, you could even create a beautiful origami dragon mobile.
* **Diorama:** Build a small scene around your dragon – a paper mountain, a tiny tree – for a more elaborate display.
* **Gifting:** An origami dragon makes a wonderfully personal and unique gift.
* **For a Birthday or Holiday:** It’s a thoughtful handmade present for friends, family, or anyone who appreciates art and craft.
* **”Get Well Soon” Gift:** A vibrant dragon can bring a smile to someone’s face during a recovery period.
* **”Just Because”:** Sometimes, the best gifts are unexpected.
* **Paired with a Card:** Tuck a small, neatly folded dragon inside a birthday card for an extra special touch.
* **In a Shadow Box:** Frame your dragon in a shadow box for a sophisticated display piece.
Folding this Trigami dragon is a rewarding experience that combines precision with creative expression. Take your time, enjoy the process, and be proud of the magnificent paper creature you bring to life! Happy folding!
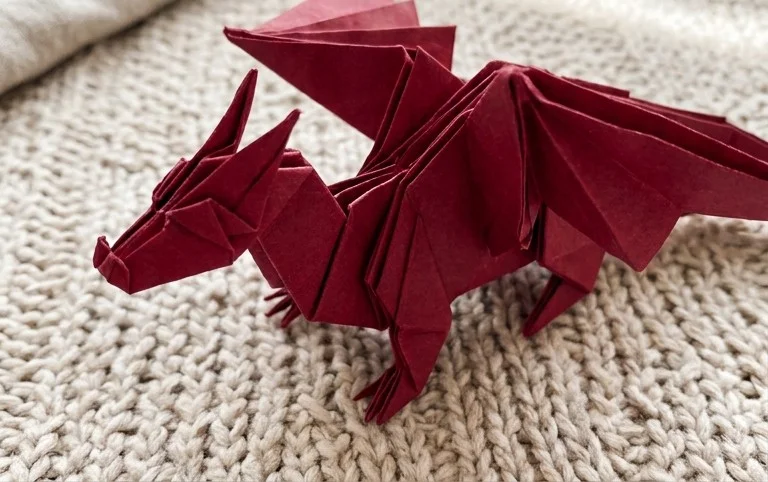
Conclusion
Congratulations on folding your very own #dragon! Don’t worry if your first attempt isn’t perfect; every #origami artist knows that practice makes progress. The joy is in the journey and the beautiful #triangleorigami creation you’ve made. We’d love to see your finished dragon – feel free to share it!
Ready for a new challenge? Try folding a more complex dragon variation, or perhaps a complementary mythical creature like a phoenix. There are endless possibilities in the world of paper crafting.
Keep folding and exploring! We invite you to discover more wonderful paper projects and unleash your creativity.
