Easy Origami Patronus Picker: Harry Potter Fun Craft
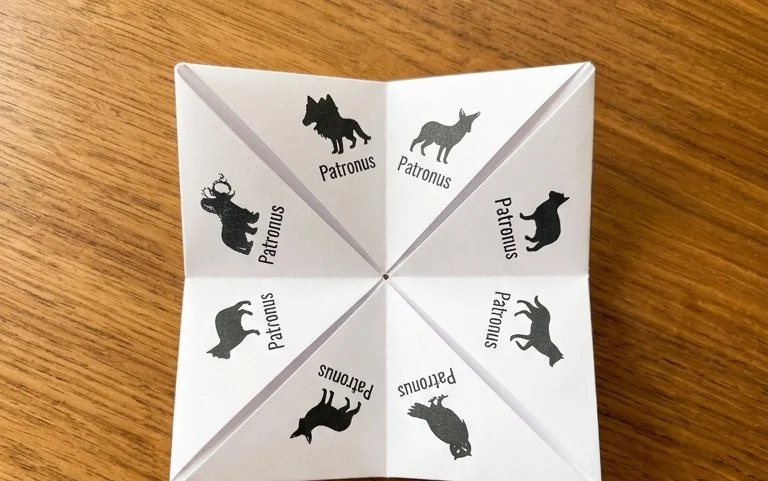
Free Patronus Picker is a magical origami project designed to bring a touch of the wizarding world into your home! Imagine a delicate, ethereal stag, its antlers reaching upwards, ready to defend against Dementors. This charming origami model is perfect for anyone looking for fun Harry Potter activities. It’s absolutely suitable for complete beginners, fantastic for kids to craft, and makes a wonderfully thoughtful gift or a unique decoration for your bookshelf or desk. You’ll be able to fold your own Patronus in about 15-30 minutes, depending on your folding speed. We’ll guide you step-by-step through the simple folds, showing you how to transform a flat sheet of paper into this iconic, protective spirit animal. Get ready to unleash your inner witch or wizard and create something truly special!
Create Your Own Magical Patronus Picker: A Fun Origami Project for Harry Potter Fans
Are you a devoted Harry Potter fan looking for a unique and engaging way to bring a touch of magic into your home? Or perhaps you’re searching for a delightful activity for a Harry Potter-themed party or a creative gift for a fellow enthusiast? Then you’ve come to the right place! Today, we’re going to dive into the wonderful world of origami to create a charming Patronus Picker. This isn’t a complex model; it’s designed to be accessible for beginners while still offering that satisfying sense of accomplishment. It’s a perfect way to add a little enchantment to any occasion, from a quiet afternoon of crafting to a lively celebration.
Choosing the Right Paper for Your Patronus Picker
The paper you choose is the foundation of your origami creation, and for this Patronus Picker, we have some flexibility.
Paper Type and Weight
For a project like this, standard origami paper is your best bet. It’s designed to hold creases well and is generally easy to fold. It typically has a weight of around 70-80 gsm (grams per square meter), which is perfect for this kind of model. If you can’t find dedicated origami paper, good quality printer paper will also work, though it might be slightly stiffer and produce a less refined final product. Avoid cardstock or very thick paper, as it will be difficult to make the necessary sharp folds and could end up looking bulky.
Size Matters
A good starting size for your Patronus Picker is a square piece of paper that measures 15cm x 15cm (or roughly 6 inches x 6 inches). This size is manageable for beginners, allowing for precise folds without being so small that it becomes fiddly. If you’re feeling adventurous or want to make a statement, you can certainly experiment with larger squares, but remember that larger paper can sometimes be trickier to handle for intricate folds.
Single-Sided or Double-Sided?
This is where you can have some fun with your Patronus Picker! You can use either single-sided or double-sided origami paper.
* Single-sided paper, where one side is coloured and the other is white, will result in a Patronus Picker with a white interior. This can create a nice contrast and highlight the structural elements of the model.
* Double-sided paper, where both sides are coloured (or patterned), will give your Patronus Picker a fully coloured or patterned finish, inside and out. This can be particularly effective if you choose paper with a subtle Harry Potter-themed pattern.
For your first attempt, I’d recommend using single-sided paper with a colour that evokes the magic of the wizarding world, like a soft blue, silver, or even a pale gold.
Essential Base Folds for Your Patronus Picker
Before we embark on the full sequence, let’s get comfortable with a couple of fundamental origami folds. Making these cleanly is key to a successful and beautiful Patronus Picker.
The Valley Fold
This is the most basic fold. Imagine you’re folding a piece of paper in half. You’re bringing one edge or corner to meet another, creating a crease that dips inward, like a valley. To make a clean valley fold, align the edges or corners precisely, hold them firmly in place with one hand, and then use the fingernail of your other hand to run along the fold line, pressing firmly. This ensures a sharp, defined crease.
The Mountain Fold
This is the opposite of a valley fold. Instead of dipping inward, the crease pops outward, like the peak of a mountain. You’ll often make a mountain fold by first creating a valley fold and then unfolding the paper. The crease line you just made will then be the base for your mountain fold. To make it clean, ensure your initial valley fold was precise, and then simply fold the paper back along that crease, again using your fingernail to press down firmly.
Your Step-by-Step Patronus Picker Folding Guide
Now, let’s get folding! Remember to take your time, be patient with yourself, and enjoy the process. We’ll be working with the coloured side of your paper facing down at the beginning, so the coloured side will ultimately be the outside of your Patronus Picker.
1. **Start with a Square:** Place your square piece of paper on a flat surface with the coloured side facing down (white side up).
2. **Diagonal Fold (Valley):** Bring the bottom-left corner up to meet the top-right corner. Align the points precisely and crease firmly along the diagonal. Unfold the paper. You should now have a diagonal crease running across your square.
3. **Second Diagonal Fold (Valley):** Now, bring the bottom-right corner up to meet the top-left corner. Align these points perfectly and crease firmly along this second diagonal. Unfold the paper. You should now have two diagonal creases forming an ‘X’ shape on your paper.
4. **Flip the Paper:** Turn the paper over so the coloured side is now facing up.
5. **Horizontal Fold (Valley):** Bring the bottom edge of the paper up to meet the top edge. Align the edges carefully and crease firmly along the horizontal line. Unfold the paper.
6. **Vertical Fold (Valley):** Bring the left edge of the paper over to meet the right edge. Align these edges precisely and crease firmly along the vertical line. Unfold the paper. You should now have a horizontal and a vertical crease, forming a ‘+’ shape on the coloured side of your paper.
7. **Form the Preliminary Base:** This is where things start to come together! With the coloured side still facing up, gently push the left and right sides of the paper inwards along the vertical crease. As you do this, the top flap will naturally start to come down towards the bottom. Use the diagonal creases you made earlier as guides. The paper should collapse into a smaller square. This is called the preliminary base or square base. Ensure all the edges are aligned neatly at the bottom. Flatten it down well.
8. **Open Side Down:** Orient your preliminary base so that the open corner (where all the flaps meet) is pointing towards you, and the closed corner is pointing away from you.
9. **Fold the Side Flaps:** Take the right flap of the top layer and fold its bottom edge inwards so it aligns with the vertical centre crease. Crease firmly. Repeat this with the left flap of the top layer, folding its bottom edge inwards to align with the vertical centre crease. Crease firmly. Your top layer should now look like a kite.
10. **Fold the Top Triangle Down:** You’ll see a small triangle at the top of the kite shape you just created. Fold this triangle down over the flaps you just folded in, aligning its bottom edge with the horizontal line formed by the top of those flaps. Crease firmly.
11. **Unfold the Flaps:** Now, unfold the two side flaps you folded in steps 9 and 10. You should still see the creases.
12. **Petal Fold (Left Side):** This is a slightly more advanced fold, but we’ll take it step-by-step. Lift the bottom point of the top layer of paper upwards. As you lift, use the creases you made in step 9 to guide the sides of the paper to fold inwards. The sides will naturally want to fold inwards along those creases. You are essentially opening up the layer and flattening it into a diamond shape. Make sure the top point reaches the very top of the model. Crease all the new folds firmly.
13. **Petal Fold (Right Side):** Flip the entire model over. Repeat steps 9, 10, 11, and 12 on this side. You should now have a diamond shape with two points at the top and two points at the bottom.
14. **Fold the Bottom Points Up:** Take the bottom point of the top layer and fold it upwards so that its tip meets the tip of the diamond shape. Crease firmly. Repeat this with the bottom point of the layer underneath, folding it upwards to meet the top tip.
15. **Flip and Repeat:** Flip the entire model over and repeat step 14 on this side. You should now have a shape that looks like a flattened diamond with four points sticking up.
16. **Inside Reverse Fold (Left Point):** Take the leftmost of the four top points. Open up the layers slightly and fold this point inwards between the layers, along the existing crease. This is an inside reverse fold. You’re essentially tucking the point inside. Flatten it down.
17. **Inside Reverse Fold (Right Point):** Repeat step 16 with the rightmost of the four top points. You should now have two points sticking up in the middle, and the outer points are neatly tucked away.
18. **Inside Reverse Fold (Middle Left Point):** Now, take the left point of the two remaining points. Perform another inside reverse fold, tucking it inwards between the layers.
19. **Inside Reverse Fold (Middle Right Point):** Repeat step 18 with the right point of the two remaining points. You should now have a shape that resembles a small bird or a stylized creature with two pointed “ears” or “horns” at the top.
20. **Shape the Patronus:** Gently pull outwards on the two top points (the ones you just reverse folded). As you pull, the central part of the model will open up, creating the body of your Patronus Picker. The two points you pulled on will form the head and tail, or the antlers/horns of your Patronus. You can gently shape and adjust these points to give your Patronus Picker a unique look. Imagine the shape of a Stag Patronus, a doe, or even a more abstract magical creature.
21. **Final Touches:** You can gently bend the “horns” or “antlers” outwards to give your Patronus Picker a more majestic appearance. Press down on the base to ensure it sits flat.
Common Pitfalls and How to Avoid Them
It’s perfectly normal to encounter a few tricky spots when you’re learning origami. Here are some common places beginners tend to go wrong with this model and how to steer clear of them.
1. Sloppy Base Folds
* **The Problem:** If your initial diagonal and horizontal/vertical folds aren’t precise, your preliminary base won’t be square, and subsequent folds will be misaligned, leading to a lopsided or messy final product.
* **How to Avoid It:** Take your time with those first few folds. Align corners and edges perfectly before creasing. Use your fingernail to create sharp, defined creases. Think of it as building a strong foundation for your origami house.
2. Incorrect Preliminary Base Collapse
* **The Problem:** When forming the preliminary base (step 7), if you don’t use the creases as guides, or if you push too hard in the wrong direction, the paper might bunch up or not collapse into a neat square.
* **How to Avoid It:** Look at your creases! They are there to help you. Gently guide the sides inwards along the vertical crease. The diagonal creases should naturally help the paper fold inwards to form the square. Don’t force it; let the creases do the work. Ensure the open end is pointing towards you when you flatten the base.
3. Messy Petal Folds
* **The Problem:** The petal fold (steps 12 and 13) can be tricky. If you don’t unfold the previous flaps completely, or if you don’t guide the paper along the existing creases, the result can be a distorted diamond shape.
* **How to Avoid It:** Make sure you fully unfold the flaps you made in steps 9 and 10 before attempting the petal fold. Then, as you lift the bottom point, pay close attention to the creases you made. They will guide the sides inwards to create the clean diamond. Flatten the entire shape carefully once it’s formed.
Varying Your Patronus Picker for Unique Creations
The beauty of origami is its versatility! Here’s how you can personalize your Patronus Picker:
* **Size:** As mentioned, start with 15cm x 15cm. For larger, more impressive Patronuses, try 20cm x 20cm or even 25cm x 25cm. For tiny, intricate Patronuses, try 7.5cm x 7.5cm, but be prepared for a challenge!
* **Paper Pattern:** This is where you can really lean into the Harry Potter theme. Look for origami paper with subtle star patterns, constellation designs, or even parchment-like textures. You can also find specialized paper with HP motifs if you search online.
* **Colour:** Don’t be afraid to experiment with colour! Silver and white are classic Patronus colours, but what about a bold sapphire blue, a regal gold, or even a deep amethyst? Consider the Patronus form you’re trying to evoke. A doe Patronus might look lovely in a soft fawn or white. A stag could be a majestic silver or deep brown.
Displaying and Gifting Your Magical Creation
Once your Patronus Picker is complete, it’s time to admire your work and share the magic!
* **Display:** Your Patronus Picker can be a delightful decoration. Place it on a bookshelf amongst your Harry Potter books, on a mantelpiece, or as a centerpiece for a themed party table. You could even string a few together to create a magical mobile.
* **Gifting:** This is where the Patronus Picker truly shines as a gift. Imagine giving a handmade Patronus Picker to a fellow Potterhead. You can tuck it into a birthday card, a thank-you note, or present it as a special surprise. If you’ve made a few, you could arrange them in a small decorative box for a truly enchanting present. They also make wonderful party favors for a Harry Potter-themed celebration.
Creating a Patronus Picker is more than just folding paper; it’s about conjuring a little bit of magic with your own hands. So gather your paper, take a deep breath, and let the enchantment begin!
Conclusion
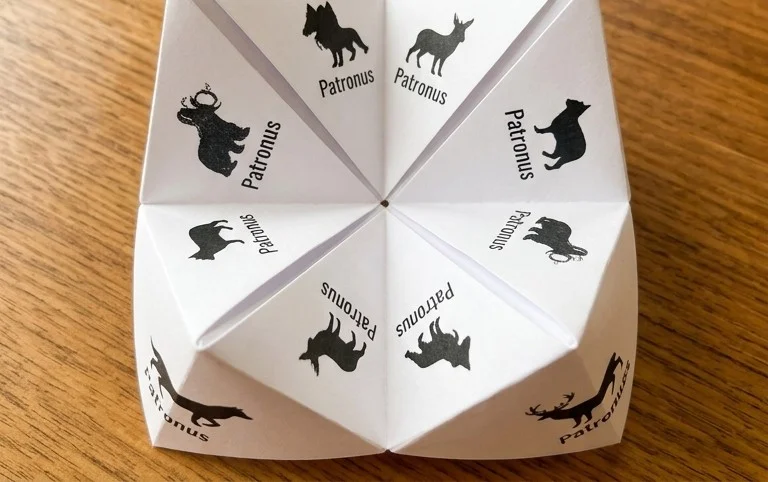
Congratulations! You’ve now created your very own Free Patronus Picker, ready to add a touch of magic to your Harry Potter activities. Don’t worry if your first attempt isn’t perfect; paper folding is all about practice, and each crease brings you closer to mastery. We hope you have immense fun with your Patronus Picker! Feel free to share your magical creations with friends and family – it’s always a joy to see what everyone makes.
For your next crafting adventure, why not try a different colored paper for a distinct Patronus, or perhaps fold it a bit larger for a more commanding presence? We encourage you to continue exploring the wonderful world of origami and discover even more enchanting paper projects.
